Deployment Configuration
PERMISSIONS Full Access or Team Access privileges in File Protection Manager
NAVIGATION
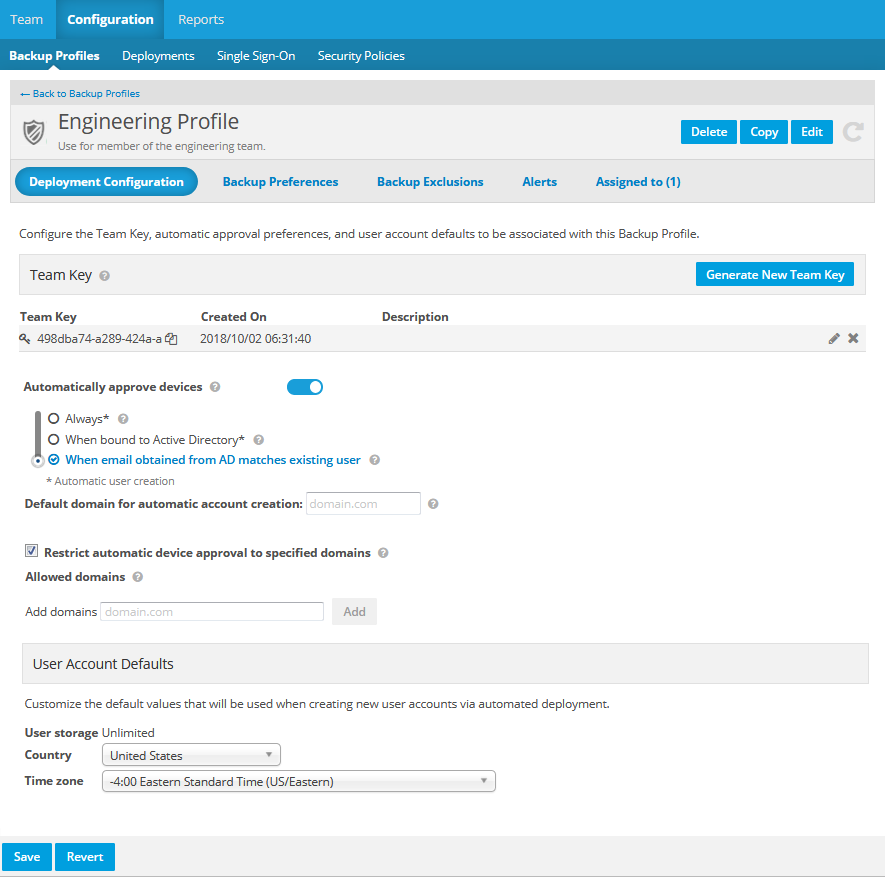
The Deployment Configuration page allows you to generate team keys, and to configure automatic approval preferences and user account defaults for this backup profile.
Before deploying , you must generate a team key. The team key is used during the installation of File Protection; it associates the device with
NOTE Ideally, your default team key should be associated with the backup profile you want to use as your default. You can always Change the default team key.
If Automatically approve devices is enabled, when File Protection Desktop or Server is installed on a device and configured with the team key, it gathers information from the Active Directory binding about the machine (if available), including the username, email address, computer name, OS version, etc.
The deployment automation options allow you to specify when a device is automatically approved by utilizing this information from the machine to create an account or match it to an existing account.
Use the Default domain for automatic account creation field to specify the domain to use when the device is not bound to Active/Open Directory.
NOTE If a default domain is not entered, the domain will automatically be set to "<TeamID>.com”
You may also choose to Restrict automatic device approval to specified domains.
TIP To ensure that device deployment and approval operates in precisely the way you intend, please carefully review the Set configuration automation options section, below.
How to...
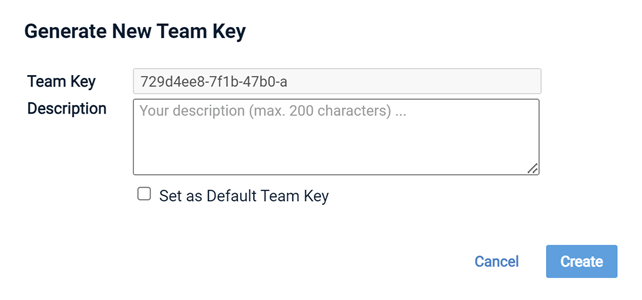
- Click the Generate new team key button. This will open the Generate New Team Key popup:

- The team key is system-generated and cannot be edited, but you can add any pertinent notes in the Description field.
- Optionally, select the Set as Default Team key check box to make this team key the default.
- Click Create.
NOTE If you have chosen to designate this team key as the default, you must confirm your decision in an additional popup window.
Click a team key. It will be automatically copied to your clipboard.
NOTE The team key itself is system-generated and cannot be edited, but you may edit the team key Description.
- Click the edit icon
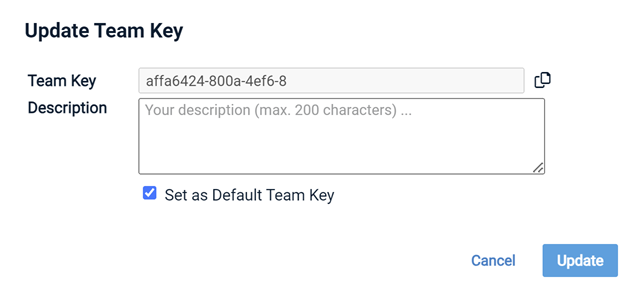
 corresponding to the team key you wish to edit. This will open the Update Team key popup window:
- Make any necessary changes to the Description field.
- Optionally, select or clear the Set as Default Team key check box.
TIP If you wish to copy the team key to your clipboard now, click the Copy Team Key button to place it on your clipboard.
- Click Update.
NOTE If you have chosen to designate this team key as the default, you must confirm your decision in an additional popup window.
NOTE Ideally, your default team key should be associated with the backup profile you want to use as your default.
- Click the edit icon
 corresponding to the team key you wish to make the default. This will open the Update Team key popup window:
- Select the Set as Default Team key check box.
- Click Update.
- Confirm your decision in an additional popup window.
NOTE Deleting a team key will not affect devices already configured using that key. It will only prevent devices from being configured with that key in the future.
- Click the X icon corresponding to the team key you wish to delete. This will open the Delete Team Key popup:

- Click the Delete Team Key button to confirm.
Use the following settings to determine device configuration automation for the team:
| Setting | Definition |
|---|---|
| Automatically approve devices |
Use the toggle switch to enable or disable this setting. IMPORTANT When this setting is enabled, File Protection Desktop devices will be automatically approved if the criteria defined below are met, and File Protection Server devices will always be automatically approved whether they meet the criteria defined below or not. When this setting is disabled, all devices must be manually approved. |
| Always (automatic user creation) |
Slide the selector button to this setting to select it and the items below it. If the machine is bound to Active/Open Directory, the email address obtained from the directory binding will be used to automatically create an account. Otherwise, the operating system username will be appended with the Default Domain to automatically create an user account. The device will automatically be assigned to the created account and approved. NOTE If the username created from the operating system username and default domain matches an existing account, then the device will require manual approval. This is a security measure to ensure that user data remains secure. |
| When bound to Active Directory (automatic user creation) |
Slide the selector button to this setting to select it and the item below it. If the device is bound to Active/Open Directory and the agent is able to access the associated email address, an user account will be automatically created and the device will be approved. NOTE If you select this option and a device is not bound to Active/Open Directory, the deployment process will be manual. |
| When device information matches existing users |
Slide the selector button to this setting to select it. When the email address obtained from the Active/Open Directory binding matches an existing user account in the team, the device will automatically be associated with that user account and the device will be approved. NOTE If you select this option and a device is not bound to Active/Open Directory, the deployment process will be manual. |
| Default Domain |
This field is only available if Automatically approve devices is enabled. Enter the domain to be used for automatic account creation when the device is not bound to Active Directory. |
| Restrict automatic device approval to specified domains |
This setting is only available if Automatically approve devices is enabled. When this check box is selected, automatic device approval will be restricted to domains specified in the Allowed domain list. |
| Allowed domain list |
This field is only available if the Restrict automatic device approval to specified domains check box is selected. To add a domain, type the domain in the field provided, the click the Add button. Repeat as necessary. To remove a domain, click the X icon next to the domain. IMPORTANT DO NOT forget to click the Save button after making changes. |
When a user account is automatically created for a device associated with this backup profile, the default you configure here will be applied to the account.
- Enter or select values in the fields below. You may override the values when creating individual new users.
| Field | Definition |
|---|---|
| User storage |
For metered plans, you may use the + and - icons to increase or decrease the default amount of storage available to new users, or enter an amount manually. The default value for this field is 2GB. For unlimited plans, the value for this field is Unlimited and cannot be edited. |
| Country | Select the default country for new users. |
| Time Zone | Select the default time zone for new users. |
- Click Save.


